

Thinking about installing a tile roof? It’s a big job—definitely not a quick weekend project.
Tile roofing looks incredible and lasts for decades, but it’s heavier, trickier, and way less forgiving than asphalt shingles.
Whether you’re going for concrete, clay, or slate, getting it right from the start is key. We’ll break it down step by step, so you know exactly what it takes—before you’re knee-deep in roofing materials.
Key Notes
- Tile roofs need structural evaluation before installation as they’re heavier than standard shingles.
- Different tile types (concrete, clay, slate) need specific overlap measurements and fastening methods.
- A properly installed tile roof lasts 50-100 years with minimal maintenance.
Step 1: Roof Inspection and Preparation
Before anything touches your tile roof, check its structure. Tile is heavier than asphalt shingles, and not every roof is built to hold that kind of weight.
A structural engineer or roofing professional can determine if reinforcements are necessary.
- Assess the current roof deck: Look for water damage, rot, or weak areas. If the deck isn’t solid, the tiles won’t have a stable foundation.
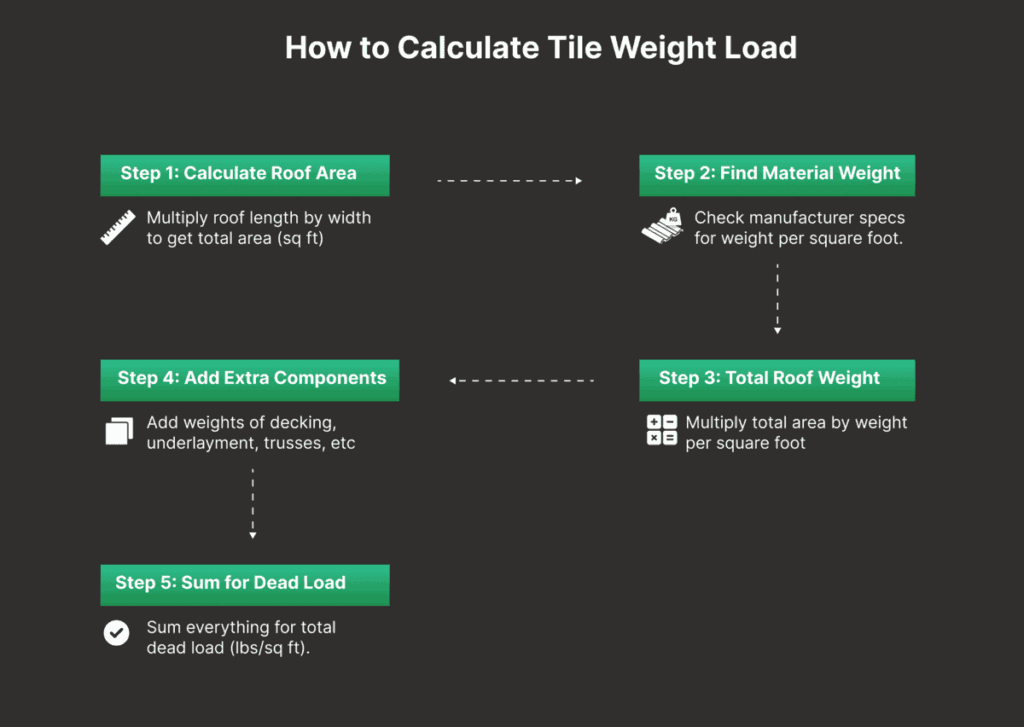
- Calculate weight load: Clay and slate tiles are significantly heavier than asphalt. If your home isn’t designed for the extra load, you’ll need reinforcements.
- Check local building codes: Some areas have regulations on tile types, installation methods, and fastening requirements.
Step 2: Removing the Existing Roof Material
If you’re replacing an old roof, strip it down to the decking. This means removing old shingles, nails, and flashing.
Work carefully to avoid damaging the deck underneath. Leaving debris behind can create uneven spots that lead to improper tile placement.
Step 3: Installing Underlayment
Every tile roof starts with a strong moisture barrier. This layer protects the structure from leaks and extends the roof’s lifespan.
- Choose the right underlayment: Options include synthetic, asphalt-saturated felt, and rubberized materials. For high-moisture areas, go with a waterproof synthetic underlayment.
- Overlap each layer properly: Underlayment should overlap by at least six inches to prevent water intrusion.
- Secure it in place: Fasten underlayment with cap nails or staples, keeping it smooth and free of wrinkles.
Step 4: Installing Battens (If Needed)
Not every tile roof needs battens, but they’re useful for better drainage and airflow. They create a grid-like structure for the tiles to sit on and prevent water from getting trapped underneath.
- Select the right size: Battens should be at least one inch thick to allow for proper drainage.
- Space them correctly: The spacing depends on tile size and manufacturer specifications.
- Secure with corrosion-resistant nail: Battens should be nailed down firmly but not over-tightened.
Step 5: Laying and Securing the Tiles
This step calls for precision. Start at the bottom and work your way up, overlapping tiles according to manufacturer guidelines. The placement varies by material.
How to Tile a Roof with Concrete Tiles
Concrete tiles interlock, making installation slightly easier. Each tile overlaps the one below it by about 3 inches. Fasten the tiles using corrosion-resistant nails or clips, ensuring they sit flush.
How to Tile a Roof with Plain Tiles
Plain tiles are smaller and do not interlock. They need at least 4 inches of overlap to prevent leaks.
Each tile is individually nailed down, making installation more time-consuming but highly secure.
How to Tile a Roof with Slate
Slate tiles need precision. Overlapping is important, usually between 4 to 6 inches, depending on the roof pitch.
Each tile is nailed twice, but the nails shouldn’t be driven too tight as the slate expands and contracts with temperature changes.
Step 6: Installing Ridge and Hip Tiles
Ridge and hip tiles give the roof its finished look while preventing leaks along the seams.
- Use the correct fasteners: Some ridge tiles are nailed down, while others use a mortar bed or adhesive.
- Seal the edges properly: Apply roofing cement or sealant to prevent wind and rain from getting underneath.
Step 7: Flashing & Sealing
Flashing is installed around chimneys, vents, and valleys to direct water away from these vulnerable areas.
- Use metal flashing for durability: Aluminum or copper works best.
- Install flashing under tiles, not on top: This prevents water from seeping underneath.
- Seal edges with a waterproof membrane: This adds an extra layer of protection against leaks.
Quick Comparison: Tile Roof Installation
| Tile Type | Overlap | Fastening | Durability |
|---|---|---|---|
| Concrete | 3 inches | Nails or clips | 50+ years |
| Plain | 4 inches | Nailed individually | 60+ years |
| Slate | 4-6 inches | Two nails per tile | 100+ years |
| Clay | 3-4 inches | Nails or mortar bed | 75+ years |
Professional vs. DIY Installation
Hiring a professional ensures the job is done right, but it comes at a cost. If you’re comfortable with roofing work and safety measures, DIY installation might be an option.
But do know that installing a tile roof is not a DIY job for the faint of heart. Mistakes in nailing, overlap, or underlayment can lead to major leaks.
Hiring a Professional
- Ensures proper installation and adherence to local codes.
- Usually includes a warranty on labor and materials.
- Is recommended for complex roof designs or heavy materials like slate.
DIY Installation
- Can save on labor costs but requires time and experience.
- Mistakes can lead to costly repairs.
- Not recommended for steep or intricate roofs.
Frequently Asked Questions
What do you put under roof tiles?
You put a waterproof underlayment under roof tiles to prevent leaks. Options include synthetic underlayment, asphalt-saturated felt, and rubberized sheets.
How are roof tiles attached to the roof?
Roof tiles are attached to the roof using nails, screws, or clips. The method depends on the tile type and local building codes.
Do roof tiles need to be nailed down?
Roof tiles need to be nailed down in most cases, but some interlocking tiles can be held in place by their weight and the surrounding structure.
Conclusion
Tile roofing isn’t a quick DIY job—it takes precision, the right materials, and serious planning. Done right, it can last 50 to 100 years, but mistakes in overlap or underlayment can lead to costly leaks.
If you’re tackling it yourself, double-check every step. If you’re not sure, a pro ensures proper weight distribution, weatherproofing, and longevity.
Want a tile roof built to last? Get a free quote today—we handle everything from structure to sealing, so you get durability and curb appeal without the guesswork.